Thursday, December 27, 2012

Undersized Urbanite-Style Decided...Finally

Thanks to the winter storm (a lot of snow-no big if you're from Buffalo) I know that I'm not going out for a while, so now's a good time to stay in and talk about my progress on the Cupboard City Townhouse. First, here's what I did after my last update;

Since my sketches are only 8X10in., but the house is 14.5X23.5 in. I decided to enlarge the earlier grayscale version and adjust it to fit the front of the house,

Which involved a little more cutting/pasting than planned. It turns out that the roof was way off.

Ditched the roof for the time being(it was just a sketch), patched a few spots on the front, and...I didn't like it. Some parts I knew would need adjusting (bigger stone pieces, less grout area, fixing parts that don't line up right), but even when I was sketching it out, something wasn't right(and it's kind of boring).

The colors weren't matching and I was struggling with the style/theme. I kept switching between Victorian & modern, floral and industrial. I knew I wanted brass and tarnished metal colors throughout the house, but my brain was not putting it all together. Hadn't looked at the plans since I packed everything up to make room for Christmas, but thanks to after Christmas sales, I decided to make a few final decisions that thankfully sorted out most my decorating problems.


One store had scrap book paper on sale, so I picked out the first floor's 'wallpaper'. Since I really want the brass fireplace to work out, instead of yellow, I'm going with just gold("brass"), and black. I almost never use gold, I don't even wear it, but I'm up for trying new things on this challenge.

So along with a riveted/brass fireplace, I decided on these modern gold/black stripes & a faded floral prints.

Went to basically every craft & hobby shop in the area and got a few post Christmas deals (sort of unrelated stuff-I'll get to later), not realizing that, by deciding on that brass fireplace and color scheme, I had settled on a style without even acknowledging it. Why? Well I came across these at my last stop:

Turns out that I was just a few gears shy of seeing the whole picture.

I'm trying to design a house around a brass fireplace, with riveted details. I'm combining brass and gears with a faded Victorian-esque floral pattern...

...Duh, it's Steampunk.

I'm making a Steampunk house! No wonder my exterior didn't feel right. It needs metal and pipes, and gears. Not the greens and grayish brown colors I've been sketching in. Thankfully I was only sketching up to this point, now I can just change a few things without having to completely redo anything (see, always sketch out your ideas first).

I haven't really tried Steampunk yet, but I know that normal looking furniture/appliances aren't going to look right, and that I should probably do some research before I sketch out the rest of the rooms. For the sake of finishing on time though, I am going to move forward with the sketches I've already started.

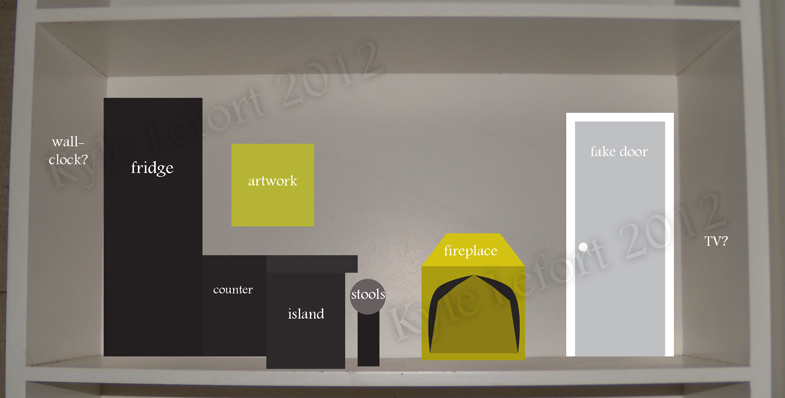
Here's the original layout;


And here's how some of my 1:12 scale furniture actually fits;


I am planning on a smaller fridge and a smaller counter/island instead of a table, so this could work. I might have to rethink the door if I can't get everything to fit, but I'm OK with that.

My current to-do list;

Finish sketching out the house
Re-work exterior
Look up how to make a Steampunk refrigerator.


Now I just have to find time to do all of this. ^_^

Monday, December 24, 2012

Merry Christmas ~ 2012

I wasn't planning on a Christmas scene, but since the Billy, happens to have a tree now, it's small resident decided to put it to good use and throw a Christmas party.


He invited his cabbage patch friends, various other random dolls, a penguin, and the Catrina from Halloween (she's been sitting outside the house since October, so he invited her in). It was a modest celebration.

Props used;
The tree, if you're not following along, is JS Miniatures.
The cabbage patch dolls are old McDonald's happy meal toys from my childhood.
Everything else is misc. gifts from friends, garage sale/ebay finds, recovered items from the Van Buren, and/or my own handmade originals.

Speaking of which, if you've had your eye on one of my mini gingerbread houses or any of my other works currently available in the Etsy shop, they will remain posted until January (unless they're sold, of course). After that, some of the listings will expire, and I'm not planning on renewing the seasonal items until those holidays roll around again(that includes fall and winter holidays).

New things are in the works for after Christmas, including progress on my entry in the Undersized Urbanite Contest (I hope), but until then,

Merry Christmas everyone!

Tuesday, December 18, 2012

The JS Miniatures Christmas Tree

I was lucky enough to be the winner of the Christmas giveaway over at the JS Miniatures blog. I've never won a blog giveaway before, so I was pretty excited. Jennifer, who is very nice btw, has a couple online shops, so I'm going to try and promote her work a little.

First, what did I win?

The Decorated Christmas Tree Kit with tinsel & baubles

I set it up inside Billy's kitchen/living room. The house's (still unfinished) resident was surprised, he didn't know that he was getting a Christmas tree. Here he's taking a break from hanging baubles on the tree, so I could take a photo. (I would love to make a Christmas scene, but I've got a deadline this week. So it will have to wait.) I like the natural wood color, but I might paint it if  I decide to keep using it in this house (it doesn't go well with the floor...maybe I should try a rug).

The tree is perfect for 1/12th scale and it's surprisingly sturdy. Little trees have the habit of falling over on me, that's not a problem with this one. And the baubles are pretty.

Jennifer also included fool-proof assembly instructions and tips for finishing the tree. All you have to do is slide two pieces together, but I could see a novice miniaturist running into trouble with paint and glue without that info.

This is a Christmas decoration, but she makes and sells beautiful minis year round.  
If you aren't following her blog yet, you can find it here.  
And here's her Etsy shop. (The fireplaces are gorgeous).

Thank you for the giveaway Jennifer! The tree was a nice Christmas surprise and I appreciate it.


Friday, December 14, 2012

Undersized Urbanite - Exterior Plan

Everything I was supposed to do this week has been delayed and pushed to next week, which means that the stuff I was saving for next week had to move to this week, otherwise I would be sitting around doing nothing. Sort of unhappy about this because now I'm behind on this week's to-do list and I had to throw some stuff together just so I could try to do next week's stuff now. On the bright side though, I did work out some of my plans for the Undersized Urbanite contest.

Click here to see my first post about this project. I'll post new photos when I actually do something to the cupboard house. Because I have a deadline and limited materials, I'm being a designer about it and sketching things out first. Here's how that's going;

The cupboard's setup is a little odd. The front is basically a silhouette of a house and the inside is a shelving unit that really doesn't match. All white, it isn't a distraction, so hopefully my siding decisions won't mess that up. I had already decided to do stone(egg carton) siding. The Van Buren's going to be an old cobblestone, so it's clean cut stone for this house.

(Just took a photo and painted over it in Photoshop)

I don't remember which architect it was (I know it was around Frank Lloyd Wright's time, pretty sure it wasn't him though. Oh, this is going to bug me...), but they thought that tall buildings should be designed to actually look tall. I kind of agree, and this house has four floors (that's tall), so I'm (hopefully) adding some vertical wood paneling along the windows to make it feel more like you're looking at a tall little house. Although, next to those small stone bricks it is looking a tad busy, so bigger stone pieces,...maybe. 
I also decided to add in a small sculptural element in-between the two upper windows as an interesting detail (sculpted out of paperclay). I marked it's place in the above sketch idea, but didn't really have any inspiration for the design. 

In my parents' kitchen, there's a very busy, entertaining old 70's wallpaper (some hate it, I love it). I kind of liked these two characters;

A very geometric looking flower would be perfect for the stone sculpture. I've also been playing around with some ideas for stained glass windows (fake ones of course), and the tail on that bird was just the abstract form I thought I was looking for. So after some copy/paste and enlarging that bird for the windows I ended up with this;

I don't hate it, but I did not really want to use red for the exterior. So I saved it in gray-scale, printed it out, and used colored pencils to sketch in some details.


I want it to be more brown than green(just a little green along the edges), but it's getting there. I didn't want to just copy that flower, so I've been reworking it into something more original, and I'm starting to like the stained glass design(this is the 4th sketch idea). Might just use white and blue because the yellow makes it look like the house is on fire (ah!). I've got some, "frosted vinyl", that I plan to use for that.

I think I'm almost ready to actually begin work on the exterior. ^_^

So how are the inside sketches going?

Well I decided that the, "Crawl Space", will be a basement. And I started mapping out the 1st floor above that;

(It's like a pile of blocks-I did this one in Illustrator, btw)

I labeled it for you, so I don't have to explain much. It's a kitchen/living room. Left is the kitchen. Right is the living room. There will be cushions or chairs once I figure out how much will fit in this space(haven't measured anything yet). The fireplace is something I've been wanting to try since last summer. This house has two implied chimneys and no giant windows to stop me. No nautical stuff though. I haven't settled a theme yet, but I know brass seashells would be a bit much(sorry houseboat fireplace).

Colors for this room,...For some reason I want to use black and yellow. That's a potentially ugly combination, (And I thought it up before I remembered the brass fireplace-which would match...) but it is different from anything I've done before. That's one of my goals with this project, so I'll go with it (at least in the sketches).

The door on the right would just be for show. The house seems a bit narrow, and I don't have room for stairs, so I'm thinking that adding in some fake doors will make it look a little more believable as a house.

I'm still a little torn on what artwork will be on the back wall. I've used business cards and print-outs before, but that was stuff I've had sitting around since I was a kid. Now I'm an adult, and an illustrator. I kind of think I should be using more of my own work. The only piece that I have that works with my current concept is, "Dancing";


It's not quite right though. There's a ton of red, And who wants a foot in their kitchen? Maybe I'll draw something new, or recolor something else...I'll figure that out once I actually have a room in progress.


Well, that's my plan so far. I like that it's only December and I already have an almost-solid idea for the exterior(I don't even know if that was supposed to be sarcastic or not). Seriously though, if you're participating in this contest, and you haven't worked much under deadlines-Get started ASAP. May will be here before you know it and minis can take forever to finish. :)

Sunday, December 9, 2012

A Quick Sale on Etsy


I was thinking about having a small sale, and there are quite a few seasonal items in my shop, so...


Semi-Random December Sale!


From now until sometime Tuesday Evening (whenever I change the prices back),
Everything in the, "Seasonal Minis and Decor", section of my Etsy shop is on sale.
No coupons needed, Sale prices are listed in the item descriptions.

Please visit the , "Seasonal Minis and Decor", section to see the new sale prices.

All purchases made through my shop by 7pm(EST) Tuesday 12/11, will be shipped out on Wednesday 12/12.


 Happy Holidays.

Saturday, December 8, 2012

A Small Surprise

Last week was St. Nicholas day. Wikipedia has a pretty accurate description, so I won't waste your time poorly re-explaining it. I'm in the United States where it's not an actual holiday, but since my ancestry is a mix between German and French, some European traditions are still kept up within my family. I always liked getting a visit from St. Nick when I was little. It gave me something to look forward to in-between Thanksgiving and Christmas (that's a long time for a little kid)

Since it's Christmas time, yes there are stockings hanging up in the living room, but I'm in my 20's now. I thought it was safe to assume that I had outgrown the tradition.

Nope, I was wrong, "St. Nicholas" showed up. I was doing some design work when I noticed that the stocking with my name on it had something tucked inside. Guess I was good this year;


It's furniture made for mini outdoor/fairy gardens, a local garden store carries them. I don't have a garden, but I was at this store a few months ago with my mother. She knew I thought these were neat, and that Billy has no outside furniture. But how St. Nicholas knew these things, I do not know...

Wednesday, December 5, 2012

Undersized Urbanite-I'm In!

Long ago, well a year or so, I started a modest blog about, me and my art/design profession, BUT THEN 3 posts in I posted a link to a dollhouse challenged issued by an HGTV star (who will not be named here).  I barely even started my blog, hadn't heard about the challenge until it was far to late to start, didn't really have time to work on a dollhouse, and was still visibly uncertain about bringing my underdeveloped miniature hobby to the internet (I can be a real idiot sometimes). My plan was to watch the whole thing play out, slightly disappointed that I couldn't find the time to enter the challenge myself. The blog fates may have been on my side though because the hostess flaked, and the participants were pretty much left to end the challenge themselves.

While that challenge was a flop, it did sort of strengthen the mini-blogging community. Or at least it helped it get a little more connected. And by finding all of these blogs I've since had the chance to be part of a few smaller challenges. Which is why after hearing that there was a new dollhouse challenge, that actually seems to be legit and not at all delusional in nature, I've been looking for a way to justify participating. And this weekend I think I found it. So as of right now I'm joining in on:


I didn't think I had a house for this, but gee, this looks like a house doesn't it?

It was supposed to be a display for future projects and I was going to use it as practice for egg carton stonework(before trying it on the Van Buren). So that's 2 birds, 3 once I add my name to the contest page, with one stone. Awesome!

Here's the inside;

Kind of weird, right?

So I'm basically doing my own miniature rendition of that White Room Challenge show. I'm thinking  city townhouse as the theme, trying to keep myself from designing the same house over and over. It's not a super small house, but it's still pretty compact.  Here's my plan, thus far;

I think I should do some sketch ideas first.

I'm got some more freelance work (I love saying that) and I'm still finishing some things for Christmas & the Etsy shop, but once Christmas is under control I'm sure I can find time to work on this project. How can I justify it? Easy, I'm a designer, and I sell minis, for a living. This is self-promotion. Why did I not think of this sooner? Because I can be a real idiot sometimes (told you).

This should be fun. I'll keep you posted.

Sunday, December 2, 2012

The 2012 Mini Gingerbread House Series

 I made a couple mini gingerbread houses last year for a contest, and they ended up being one of the most popular things in my DA gallery. So I thought I would try and make it a yearly tradition.

This is the 2012 Mini Gingerbread House Series, by Kyle Lefort;


Everything is hand sculpted. The houses and tiny candies are polymer clay and TLS. The base is re-purposed cardboard, covered in paper-clay, and painted with acrylic paint.

They took f-o-r-e-v-e-r to make (started in September), but I'm pretty happy with them.

I just posted them all separately in my Etsy shop.
I don't like being a salesman, but when they're gone, they're gone-just sayin'.

Happy Holidays. :)

Friday, November 30, 2012

Cubebot Challenge-The Subtle Sleepover


It turns out that people like playing with Cubebots. So much so, that the first three times I tried working on this challenge, one of my brothers would come along and mess up whatever pose I had the little guy in. First time was fine, but after the next two incidents, I decided to work on my set up in secret.

That's reason #1 for why this took so long to finish. #2 is the Etsy shop (tis the season), and #3 would be that I needed to figure out how to make some semi-decent looking twin beds...for a clubhouse...a nice clubhouse.

Before I get too ahead of myself:
The Cubebot Challenge. <-For those just tuning in.

How did I get a Cubebot? ...Internet.

Why? Uhhhh...Last summer I was reading the blog, Mini Modern, and in one of her posts involved a small Cubebot. Loved it, looked it up online, and found that I could actually afford one (yay!). So I bought a small Cubebot, patiently waited for it in the mail, and guess what? He was just a bit too big to live inside my little 1:12 scale house (although he's welcome to stop by anytime). I really love it though, and was looking for more excuses to take it out the box when Call of the Small posted this challenge.

Previously listed excuses/reasons notwithstanding, this is my response to the Cubebot Challenge;

"The Subtle Sleepover"

To big to play in the house, the children thought it would be fun to build a club house with (well, out of actually) Cubebot, so that he wouldn't be stuck playing outside this winter. And since they're just across the yard, the parents don't mind the occasional weekend sleepover. Especially when the, mostly responsible, aside from eating a few crayons now and then, Cubebot is keeping an eye on them.

Happy to have participated. A big Thank You to Call of the Small & David Weeks/Areaware for the challenge.

Tuesday, November 27, 2012

Ok, Now I'll talk Christmas

If you regularly read my blog, then you  know that I was trying to decide how long to wait before hopping on the Christmas train. Turns out, my out of town family, that supposedly couldn't make it here for the holidays this year, did manage to come home for Thanksgiving. Since I wasn't about to pass up family time, I suppose the decision was made for me.

Long story, short-It was great, but now that I've come down from the pumpkin pie rush, and managed to avoid Black Friday mob hystery for another year, time for Christmas.

Because it's fun to stagger things, and I've still got a row of unfinished minis & other work drying on the table next to me, I'll be posting new Christmas items up on Etsy throughout the week.

Right now, ornaments!

I love mosaics, it must be all the little details.

I've also been trying my hand at primitive style, hand stitched designs.

Bold colors, anyone?
If you want the most up to date...updates on what's new in my shop, "Like" me on Facebook.  
Also on my to-do list: Call of the Small's Cubebot Challenge. Entries have to be in by Dec. 1st, so I should probably finish mine soon. I really did not mean to take this long on it, but legit actual freelance design work and Etsy shop stuff has been occupying most of my time lately. I'm busy in a good way (seriously I've spent months trying to make all this happen), but something was going to get pushed aside now that I've got real deadlines again and this challenge ended up being it. Planning on spending tomorrow working on finishing some things, mostly tying up some loose ends and taking a break from my laptop, because today I was using it from 1-6pm & and then 11-well it's 2:30am right now...Yep, tomorrow I'm staying off the laptop for a while.

So remember, Etsy/Christmas, all this week. My Cubebot entry-coming soon. Next post.


Wednesday, November 21, 2012

A Happy Thanksgiving to All & to All: Look What I Made

Somewhere in my memories there is a turkey shaped basket filled with dinner rolls at Thanksgiving dinner. And for some reason this year, I just felt the need to try and make said turkey basket, in miniature.

My first attempt was embroidery floss woven around bead wire on a cardboard base. The glue I used didn't hold and the cardboard kept bending, making the wire twist around and slip out of place as I worked. The end result was pretty lop-sided and the basket ended up looking more like a goofy brown swan than a turkey.

I thought that maybe if I used polymer clay instead of carboard, I could get the results I wanted. Of course, I already spent way too much time on the first attempt. Despite that, one morning I made out a template to trace onto a slab of clay, because I did want to try again. Then later online I saw that one of the DeviantArt groups I belong to is having a holiday contest. See? I was supposed to try again!

The contest is still open for a while, and I'm still working on my Cubebot Challenge entry (Dec. 1!), BUT since Thanksgiving is tomorrow, I had to be done with this project by...well, right now.


Once you make the basket, of course you need to sculpt and paint tiny rolls to go inside. And because I like making scenes so much, I needed to make a few more things to go with the basket. So I dug out the paper punches and made leaves. Then I made some ridiculously tiny construction paper chains. Thought I was done, but the table looked like it could use a center piece. I sculpted some candles, coiled a strip of paper for a candle holder (with leaves and seed beads), glued it all together, and finished this project by sealing the basket/rolls/candle holder with Polycrylic.

Am I happy with the results? Yes. Do I actually have a place to put all this stuff now that it's done? Nope. Not until I finish the dining room in the Van Buren...could be years.

So everything, except the table/back drop is being listed as a set up on Etsy. Will anyone buy a Thanksgiving themed mini decor set after Thanksgiving? I dunno, some people buy holiday minis year round, so maybe. I'd rather try to sell it and help fund the Van Buren rehab, instead of packing it away forever and potentially losing or breaking parts by the time I'd get to use it myself(in which case I'd still have to make a new set anyway). I'm just happy keeping a photo this time.

+++++++++++++++++++++++++++++++++++++++++++++++++++++++++++++++++++++++


Also, as previously mentioned, there are Christmas items headed for the Etsy shop too. I'm debating whether or not I should post them this week or hold off until after Thanksgiving. From the business end of things, now would be good, but...If you're not familiar with U.S. holidays, Thanksgiving is all about being thankful for what you have in life, but then the day after Thanksgiving is referred to as, "Black Friday" (A store's income is listed in red if they're not turning a profit, so hopefully after all the Black Friday sales, they'll have made enough to be operating in the black again-get it?). It's pretty much just a day of people going nuts and buying tons of stuff for great deals, you know, for Christmas. I'm sure there are good intentions in there somewhere, although it's gotten so crazy (Friday starts Thursday at 8pm kind of crazy). I'd rather we all just take time out of our lives to enjoy a holiday before we run off to get ready for the next one. I dunno, I'm still thinking it over.


Anyways, if you're in the U.S. have a Happy Thanksgiving, and if you're elsewhere in the world... hope you have a happy Thursday. :)

Saturday, November 10, 2012

Some WIP & a Made Up Holiday

I've got some family that lives out of town, and as it turns out, we won't be together on Christmas or Thanksgiving this year. The solution to this problem? A Pseudo-Christmas celebration, like right now.

OK, I did get a two week notice, but let's see you try to both buy and make a handful of Christmas gifts in two weeks when you normally would have a couple months ( *Mmhmmm* ).

And, while I'm typing up this post-I'm also working on throwing together an adorable table top Christmas tree for my mother. Basically, after my stint at a craft show last year, she thoughtfully bought me a faux-tree better suited for a show table (sadly, no shows this year though), which I then volunteered to use for Pseudo-Christmas. First, I was told not to bother, but any other tree we might have would need to be dug out of storage, along with all the ornaments. I've still got some leftovers from the show, a couple experiments I haven't quite figured out yet, and some new ones that should be up for sale on Etsy this week. Plus, let's face it, I'm a crafty person (So I got this).

And while all that can be summed up rather quickly, I have been a little pressed for time, making a few gifts (for my niece again) along with an assortment of Christmas items for the Etsy shop. On Friday, I was hoping to have all gifts made, bought, sealed, and wrapped, but then I got caught up in running errands. Was I annoyed? A little, but some of it was kind of fun. And I came home with some remnant bin finds, which led me to my fabric stash in the basement, which is when/where I decided to post some teasers about what I'm working on right now.


Since Billy has a semi-permanent table to sit on now and it looks terrible as-is, I decided to add a yard(or at least some sort of ground cover). No budget, but I had this gray, liner type fabric (Billy's upstairs carpet is the same stuff-in blue) that I thought could work...if I paint it maybe... I tried it out with the Halloween scene and then left it there, hoping it would grow on me. It didn't, that's OK though because my remnant find of the day was that same material in, "Outdoor Green", 30% off (ha-Ha!...I'm such a dork).

Didn't have time to work on it, so I just rolled it out to see how it looks 
(already much better than brown beat up table).
So that's WIP 1.

WIP2.  Maybe it should be #1 because I'm currently working on it, but...Christmas stuff!

Been working on these since September, I'll let you guess what they are.


Mixed Media Ornaments 
The bottom one is a gift, top right still needs paint, but the other two I'm hanging on the tree tonight. More on the way. I keep looking for excuses to do mosaic work, sort of as practice for some ideas I have about the Van Buren. Speaking of which...

...No that's not the Van Buren. It's a neat little shelf/cabinet I picked up at an antique co-op 2 summers ago. It's not really an antique, but I got it for $20. From my understanding, front open houses are pricey, so this really was a find. I'm mentioning this house because, like the Van Buren, I want to do exterior stonework siding of some sort. So I think I'll use this little guy as practice. Better to have to redo a botched siding project on the small house instead of the big one, really though I can handle mosaics. How hard could faux stone siding be?
This isn't gong to happen for a while though so, oh hey, did I ever post about my type set drawer?

I got this one last summer at another co-op. I've been wanting one for a while now. They're neat because: A) If I were a graphic designer and/or printer, "Back in the day", (like before I was born) I'd probably use a printing press, and would have a bunch of these filled with letter blocks. And B) I wanted something like this to display my mini work. I had to glue together some spots, and clean it, and seal it (because there was so much smeary ink/grease in the sections, I couldn't use it otherwise), but I still think I got a deal on it. The WIP part is that I'm still considering adding some scrap paper to a few sections for color.

If  you're keeping score, I think this next one is WIP #5...


Progress with what I'm doing with the lamp shades, and some other house accessories. I like where it's going, but it's slow work, so it might be a while before any of these make it to the shop. Also, I think I made more lamp shades than I will use for a while, so maybe I'll start selling batches of lamp shades? Or DIY lamps, what do you think?

Lastly, (I really need to go finish decorating that tree) WIP #6,

Wood and vinyl...hmmm, What am I making?

Well, I hope you've enjoyed this, and are intrigued. Will I finish it all? Maybe...I'm also working on a couple challenges too, we'll just see how it all goes.

I'm going to finish decorating so I'm not up ALL night (and then it's family time).

 So...Happy Pseudo-Christmas!


Saturday, November 3, 2012

So...hurricane Sandy...yeah...

I was conveniently out of town when Irene blew through, but I was told it didn't do anything to this side of the state. I also missed the whole, watching a massive storm system crawl across the weather channel's radar screen toward your town, thing(scary stuff). I was here for Sandy though.

Fortunately, we got a ton of wind and rain, but that's it. The power didn't go out and there were no downed trees in the yard. Of course it took until almost 5 a.m. to realize that. Did I mention that I ended up watching the live coverage until 5 a.m.? In light of what hurricanes do to the north east...Can we stop getting them, please? I mean what we got here was just a wet blizzard, but it was so much worse everywhere else. Look, I'm ranting, see it's scary stuff. And there's still a winter to get through...

Any-who...

Why am I posting? Right, the Van Buren. Quick story; If the power ever goes out, the sump pump fails, and then the basement starts flooding. By, "flooding", I mean everything on the floor gets wrecked and the water has to be manually removed from the basement-with buckets and such. So, when a bad storm was coming we prepared for the worst, which meant moving everything away from the sump pump for quick access and to help keep the whole flooding issue in check. Great idea. My problem?

The Van Buren lives in that room.


It's a good thing I fixed it's foundation because it's holding a couple pounds worth of random basement stuff right now.

So I haven't been working on the house and I haven't been able to try removing the stuck floor tiles yet.

Instead I've been working on a gift for a family member, and more things for the Etsy shop.

I feel like I keep starting things that the world just won't let me finish(so then I start something else). Hopefully, I can get it together this week and complete something-anything.

Sunday, October 28, 2012

Halloween Scene

If you follow the blog Mini Mod Pod, then you know about the Halloween challenge.

I love Halloween and minis, so of course I'm joining in on this. Here's what I came up with;


Yeah, I know I was supposed to try for spooky, but I had this image in my head and just went with it.

The assorted mini ceramic pieces, furniture, metal jack-o-lantern pail (under table), and some accessories are all purchased items (craft shows, garage sales, found items, ebay)

What I made: The flower arrangements, the polymer clay jack-o-lantern on the ground and the box on the table, the punch bowl set (still have a few up on Etsy), the leaves (They're REAL), the polymer clay gourds scattered amongst the leaves, and the "Day of the Dead" styled skeleton woman(sort of). The backdrop is one of Billy's side exterior walls.

Now back to that skeleton woman. It's not part of my culture, but thanks to several years of high school Spanish classes, I know a few things about, "El Dia de los Muertos", and sort of admire some of the visuals used. I believe these dolls are called Catrinas and I've been wanting to try and make one for a while (wikipedia for more info).  I'm pretty happy with the results.

It's a little late to make more for the Etsy shop this year and I think I need to find some sturdier material and sealers for the next time if I intend to sell these(quality first). So as a small Halloween gift to my readers/followers, here is a brief tutorial on how to make your own. (apologies for the poor lighting/rough layout-I did most of this at night).


Finally, add clothing(I just wrapped her in strips of cloth), some props, and-Ta da! You've got a Catrina.
 
If you try to make one, let me know. I would love to see how yours turned out. :)


Despite the east coast weather, I hope everyone has a great week and eats lots of candy!

 
Happy Halloween


Thursday, October 25, 2012

Van Buren-Concept idea

I apologize for putting this off for so long, (but it was a lot of thinking and typing).

First, since it's been a while, Ta-da!


I think I've pulled enough wallpaper off the walls that I can sand the rest down. Most of the busted flooring came out, a couple problem spots and some glue to remove. Everything is going good,..
Except this room-The kitchen;


I've been asking around, and now I've got a small list of things I can try to get this floor out. I'll let you know how it goes. The loose bits of wallpaper came out, but I've lost my patience with this room. I'll probably just sand the rest down.

Since, aside from the floors, I completely painted Billy, and this house would need extensive sanding for me to attempt that again(I am tired of painting anyways), this house is going to have a lot of wallpaper, tiles, and wood paneling.

And now for the concept idea part;

Some ground rules for the colors (so it doesn't look like a larger Billy)
before I forget to mention it;
Warm colors. reds, browns, greys on the exterior. The interior is a little more flexible, but I'm still trying for the muted warm feel.

This isn't a new house. It's been, "lived in", by a couple different people and abandoned for who knows how long(there was a tiny calendar from the 80's inside-true story). I've watched people fix up old houses/buildings in real life. Not to take away from all the work they've put into their homes, but I'm doing something surprisingly similar...on a 1/12 scale, of course. So I want it to look like someone happened upon this house, liked it, and moved in.

Also unlike Billy, this house is going to have a permanent family living in it (dolls?, I dunno). I'm thinking a couple with a child or two. Somebody's going to be an artist or craftsman because I'm seeing a studio on the 3rd floor. Before I get ahead of myself, let's look at the plan;


Master bath in the attic/3rd floor? At first I thought someone bashed in that middle room(the other rooms are just too big to be a bathroom), but no, that's just the Van Buren. Check out the hallway/crawlspace between the bathroom/roof. It's a rather large space that I can barely reach(my only complaint about this house design).


It's kind of weird to have to walk up to your attic just to find a bathroom, so my solution is to make the right half of the attic a master bedroom(weird, but old houses make you do weird things sometimes), left half-the studio space. And since I've got two stairway closet spaces, but I'm only excited about the one on the first floor, I might try to cheat in a half bath, you know, so the, "kids", have something on their floor.

                                                                                                  (Maybe)...


This is the living room on the second floor. The mid-wall molding is something I'd want in a dining room(which should be on the first floor with the kitchen), so I'm going to pull this out. I'll move it downstairs, or buy more if it turns out to be rotted like some of the door frames.


Not sure what's happening with the doors yet, but I've been pulling out all the frames so I could remove the busted hinges(they'll be clutter in the closet or something-I've been trying to save/reuse what I can) along with the window trim so I could remove the old aceate(decided not to replace it-I like being able to reach through the windows). Some rooms should have doors, but some would look better without them. I'll think it over.

Now the exterior;


           (aside from the shingles and chimneys being gone, outside hasn't changed much)

 The widow's walk will probably be a rooftop garden,accessible through the studio.
I might just scratch rebuilding the balcony and just make a big window to replace the doors. Two reasons for that: 1. I'm missing a door and the one I do have was attacked by a crayon and needs to be remade anyway. 2. When I move the house to another room, it just clears the doorway. It won't fit through anymore once I rebuild the balcony. The house has a widow's walk, does it really need a balcony? I don't think so.

This house doesn't have siding, which I wouldn't have noticed, except that Billy has milled siding(and I really like how it looks). As a result, I have slightly higher expectations now. I want to try something new, so I'm (in theory) going to make my Van Buren a cobblestone. Talked my family into saving me egg cartons and other packing material, so I won't have to spend a fortune on clay to do this. I need enough to cover 3 walls and a few areas around the open side. That pile looks promising, but I think that I could still use a few more.

...So that's the Van Buren, thus far...If you read this whole post,
I salute you...onward!